Friday, December 24, 2010

More "green" wrapping paper

Here are a few more pictures of my re-usable cloth gift wrap.  I sometimes wrap (roll) the gifts in cloth and add ribbons.  Other times, I sow a bag and close it with a pretty ribbon.  Here are some more examples:


The gift on the left and the one in the middle are both in bags and the one on the right is "wrapped".
My DD10 told me that she really likes the cloth because she can wrap gifts by herself.  If you are all about ripping through the wrapping paper, this is not the technique for you.  

(Just for clarification: wrapping paper is not recyclable.  I am a recycling maniac and have been for at least 15 years.  My children have grown up with my enthusiasm, so they have a real appreciation for reusable materials.  I will also clarify that I am still using up all of the gift wrap I have bought over the years.  Sometimes it serves a much better purpose than cloth.  For example, when gifting to a non-family member who may just throw the material away afterward.  Really, Christmas is NOT for stressing over this kind of thing.)

May everyone have a Merry CHRISTmas and remember the true reason for the season!!

Thursday, December 23, 2010

Applesauce Cake in a Jar

Thanks to my friend Yvette, I have another new delicious recipe.  She invited me over to cook up a batch of these on Tuesday and these little cakes are delicious.  There's really nothing healthy about them, but it's Christmas time and so that should be explanation enough.  The really fun part of making them (next to doing so with a good friend) is that you bake them up in canning jars.  How fun is that?!
It is important to note that you will need pint size canning jars with no neck.  I specifically used Ball's jars with wide-mouth lids.  They work perfect!  The point is that when you take one of these babies off the shelf, you can pop the lid and slide the cake out of the jar and commence slicing.  The spices in this cake are so yummy, so I'm not sure how long your jars will remain on your shelf.  However, they will store well, so feel free to make a bunch of them.  They also gift well!!


Ingredients

2/3 cup shortening
3 1/3 cups sugar, divided
4 eggs
2 cups applesauce
3 1/3 cups flour
1/2 tsp. baking powder
2 tsp. baking soda
1 1/2 tsp. salt
1 tsp. cinnamon
1 tsp. ground cloves
2/3 cup nuts (optional, we left them out)

Directions

Preheat oven to 325 degrees.

Cream together shortening and 2 2/3 cups sugar (set aside 2/3 cup sugar).  Beat in eggs, applesauce, and remaining sugar.

Sift together remaining ingredients, except nuts.  Blend into applesauce mixture and add nuts, if desired.

Pour into well-greased pint jars, filling half full (I found that filling to the line with the 6 by it worked perfect).

Bake at 325 degrees for 45 minutes or until a cake tester comes out clean.  Remove from oven.  Wearing an oven mitt to hold on to the hot jars, wipe the top rim clean.  Put on lid and ring.  Jar will seal as the cake cools.  When the jars are cool, tighten rings again.  Store as you do other canned goods. 

Makes 10 pint jars of cake.

Tuesday, November 30, 2010

Turkey Pot Pie

This is one of the few dishes I make that I just throw together quick and bake.  I prefer to use fewer processed ingredients, but we all need a go-to dish for when we are tired.  This is one of those dishes.  Besides being almost effortless, my kids will eat this with all of the veggies packed in it and my hubby enjoys it even though he detests store-bought pot pies.

Ingredients:

2 (9-inch) unbaked pie shells
1 (10.75 oz) can condensed cream of potato soup (or other cream soup)
1/3 cup milk
2 cups cooked, chopped turkey meat
1 (15 oz) can mixed vegetables, drained (I buy the mixed kind with potatoes, like Veg-All)

Directions:

1. Preheat oven to 400 degrees.  Place one pie crust in an ungreased pie dish.
2. In a medium bowl, mix the soup and milk.  Stir in turkey and vegetables.  Pour the mixture into the pie crust in dish.  Top with the other pie crust and seal* the edges.
3. Bake at 400 degrees for 45 minutes, or until the crust is golden brown.


I forgot to buy cream of potato soup, so cream of chicken is pictured.  Feel free to substitute according to your taste or whatever you have on hand.


*As you can see, I don't crimp the edges.  This is my "lazy mom" dish, remember?  Keep it simple! 

Sunday, November 28, 2010

Reusable a.k.a. "Green" Wrapping Paper

In an effort to throw away a little less wrapping paper, last year I wrapped a couple of gifts in fabric.  I liked the look so much that I decided to do a few more gifts that way this year.  I picked up Christmas prints on clearance and packed them away for this year.  I also picked up some scrap ribbon for a steal at Hancock Fabrics.  Here are a couple of photos of some gifts we have wrapped with cloth so far this year.

Monday, November 22, 2010

Whole Wheat Pumpkin Pie Pancakes

If you love white bread and dislike wheat bread, read no further.  If you love the texture of whole wheat and oat bran, read on.  These pancakes are not like anything you will find at the local pancake joint (at least I think not, but I can't say I've been to any pancake places in a very long time).  My family is used to my "heathifying" almost every recipe that comes my way and they LOVE these pancakes.  My DD8 can make these on her own and is happy to do so because we love these so much (and because she loves to cook).

Ingredients:

1 cup egg substitute (or 4 whole eggs)
3/4 cups pumpkin (fresh or canned)
1/3 cup sucanat sugar (or raw or white or whatever)
1/4 cup canola oil
2-2 1/4 cups skim milk

1/2 tsp salt
1 1/2 cups whole wheat flour
1 cup oat bran
1 1/2 tsp baking powder
1 tsp baking soda
1 Tbls cinnamon
1 tsp allspice
4 tsp pumpkin pie spice*

1/2 cup cinnamon baking chips (optional, but recommended!!!)**

*pumpkin pie spice replacement: 1 Tbls cinnamon, 3/4 tsp nutmeg, 3/4 tsp ground ginger, 3/8 tsp ground cloves (I used these measurements regularly until my spice purchase through the co-op a few weeks ago).
**Cinnamon chips are packaged just like chocolate chips and can be found in the same area.  They used to be quite hard to find, but I think they are more common now.  I first found mine at Hy-Vee.

Directions:

1. Combine egg substitute, pumpkin, sugar, canola oil, and milk in a large bowl.
2. Combine the rest of the ingredients (except cinnamon chips) in a smaller bowl. (I consider this optional since this is a loose mix).
3. Mix in the dry flour mixture with the wet pumpkin mixture until smooth.  Don't over mix.
4. Pour batter onto lightly greased griddle or skillet.  Drop 5-6 cinnamon chips onto each pancake and bake as you normally would.


Personal notes: This is a runny batter--don't worry about it.  You can add more dry stuff if it freaks you out.  I use a standard size ice cream scoop to put my batter onto the griddle.


The runny batter


On the griddle.  Mmmm, can't wait!


Some of the pancakes.  I forgot to mention that this makes quite a few!  I like to pop leftover pancakes in the toaster and reheat them.  They're almost as good as fresh that way.

Oriental Green Beans

I love fresh green beans and this is a "recipe" I've thrown together many times.  My family loves it.  I use my large Pampered Chef micro-cooker for these.  I apologize that I don't have any measurements.

A bunch of green beans (maybe a pound??)
A big glob of butter or margarine (1-2 Tbls)
A big splash of soy sauce (maybe a Tbls?)
A couple of spoonfuls of garlic (maybe a Tbls again)
I also added a small splash of sesame oil this last time with success

Be sure to add the lid and cook for 4-6 minutes depending on desired tenderness.

Here's a photo:

Monday, November 15, 2010

Fruit and yogurt smoothies

I love smoothies and I make all kinds of variations.  Most of them involve whatever fruit is in the house/freezer and a bit of fruit juice.  However, these are the super simple version that we've been making regularly for awhile now.  They freeze nicely and are great to take somewhere to eat later, since they thaw in a few hours.

These are the ingredients:
Plain yogurt
Ripe bananas
Frozen strawberries

These come out with just the right slushy consistency if you use fresh bananas and frozen strawberries, but you can vary it however you want.  I have no exact measurements, so I am listing below how we do it around here.  I call my DD8 the "Smoothie Queen" because she whips these up for everyone all on her own, leaving me free to do other cooking/baking.


First of all, I buy big tubs of yogurt from Costco because we go through a fair amount of this stuff.  We use it as a replacement for sour cream, too.


I scoop TWO big spoonfuls of yogurt into the blender.


 I add ONE ripe banana.  After the yogurt and banana are in the blender, I blend it well.  It is easiest to do this before adding rock hard strawberries to the mix!


Then I add 5-6 frozen strawberries.  We also buy the big bag of strawberries from Costco since we use them fairly quickly.  Blend again until desired consistency.  I like slightly chunky smoothies, but my kids prefer them smooth.  Each of these "recipes" makes one big serving.


I drop the fruit through the top of my blender, blending in just one or two strawberries at a time.  I cover it with my hand to keep the bottoms of my cabinets clean. :0)  Sometimes we add pineapple to these, too.  Feel free to throw in whatever you have on hand!

Monday, November 8, 2010

Sweet Potato Rolls

Here is another one of my favorite recipes.  I make these every Thanksgiving and at other various times of the year.  I made them just last night for our church friends we potluck with every Sunday night.  Here is the recipe:

1 (.25 oz) pkg active dry yeast or 2 1/4 tsp. if you buy it in a jar like I do
1/2 cup warm water (110 degrees)
4 tablespoons sugar, divided (I use raw sugar or sucanat, but white is just fine)
1-1/2 cups canned sweet potato puree (I use baked sweet potatoes)
3 tablespoons butter or margarine, softened
1 teaspoon salt (I use sea salt)
2 eggs, slightly beaten
3-1/2 to 4 cups all-purpose flour

1. Dissolve yeast, warm water, and 1 tbsp sugar in mixing bowl.  Let stand 5 minutes.
2. Add remaining sugar, sweet potato, butter or margarine, salt, and eggs.  Stir to mix well.  Stir in 3-1/2 cups of flour.  Mix and add more flour as needed to make the dough firm and slightly sticky.  Turn onto floured surface.  Knead 2 to 3 minutes, adding just enough flour to prevent sticking; avoid kneading too much.  When dough is smooth, shape into a ball.  Place in an oiled bowl and turn to coat surface.  Cover and let rise for about 1 hour.
3. Punch down and allow to rest for 2-3 minutes.  Divide into 16 balls (these are big rolls; if you want smaller make more rolls).  Place on greased cookie sheet or in a 9x13 in. pan.  Allow to rise until doubled.
4. Bake at 375 degrees for 12 to 20 minutes.  Serve warm.

I used my Kitchenaid mixer last night to make these and they turned out just as great as ever.  Here are some photos:

The dough before it had risen.
 After the dough had risen and the balls were formed.  Next the balls still had to rise once more (they fill the pan after they do!)

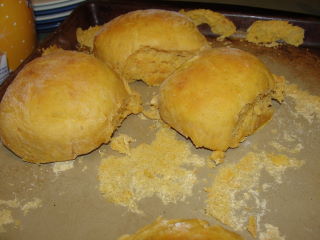
I forgot to take a picture of these when they came out of the oven.  By the time I remembered, just moments later, the vultures had swooped.  Here is what was left.  I love the orange-ish tint these rolls have.  They are so moist and I love the idea that they have some added nutrition to them.  I will be trying these with 1/2 white wheat flour in the future to see how it affects the texture.

 Okay, here is a picture from Thanksgiving Day.  I accidentally got the rolls a little browner than normal (I was using my bottom oven which cooks quicker).  But, they were still delicious and now you know what a full pan of these babies looks like. 

Monday, November 1, 2010

Oven-baked bacon

Do you hate the mess of frying bacon, but love the taste?  So do I!  Many years ago my DH taught me to bake my bacon.  If you haven't heard of this method, it is the best!

Every few months we buy 3-4 lbs of bacon from Costco or Sam's and spend some kitchen time getting it all baked up.  You have to allot a fair amount of time, but you don't need to stand over this so you are able to go do other things, like watch the football game.  After it's all done and cooled, we put it in a gallon zipper freezer bag and freeze it all.  Whenever we need some, we pull out a few pieces, place them on a paper towel and reheat them in the microwave for about a minute (depending on the number of pieces).  Try it, you'll like it!  It's especially nice when you just want a piece or two for your soup or baked potato.

Here's how we do it.
Preheat the oven(s) to 325 degrees.  Place as many strips of bacon as you can on a broiler pan.  The beauty of this is that the majority of the grease drains off to the bottom of the pan.  Bake for 20-30 minutes (longer if you have thicker bacon) or until crispy.  Lay bacon on paper towels to cool.  Repeat until all bacon is cooked (we use both ovens to speed up the process).

fresh from the oven
cooling on a paper towel

Try not to eat it all.  This almost melts in your mouth!
 

Saturday, October 30, 2010

Azure Standard Co-op

As my Facebook friends already know, I joined a co-op this week.  I've been very excited because I was able to purchase a case of organic Honeycrisp apples for a fantastic price!  We've just discovered these gems this summer and my husband is now hooked.  My family goes through apples pretty quickly around here.  Slather on some natural peanut butter and they are a well-balanced snack for anytime.

I've had several people ask for details about this co-op.  I've been googling for one for awhile to no avail.  I finally read in a blog somewhere about this one.  (I wish I could remember whose that was so I could give credit). This co-op is like Whole Foods on wheels.  The name is Azure Standard and you can visit their site at www.azurestandard.com.  Once you sign up you can view their prices.  If your family eats a lot of organic, this may be the jackpot for you!  We eat some organic items, but I focus most of my efforts on non-processed foods.  Maybe I'll be able to make more of a switch?

Here is a picture of what I received (I had also ordered canning jars but they were not shipped)


Here is the breakdown on cost:

4 oz. pumpkin pie spice $2.30
1 box green chai tea, organic $3.85
3 small avocados, organic $3
1 cauliflower, organic $2.05
20 lbs. Honeycrisp apples, organic $26.40 ($1.32/lb.)
5 lbs. oat bran, organic $3.65

The total was $41.25.  There is no tax, but there is a shipping fee of 8.5%, which is just a bit less than our local tax.  It's a fair trade-off to me.  My total after shipping was $44.76.

A lot of my money went into the apples.  One of the nice things about this co-op is that you can split cases with other members.  There are smaller and larger sizes of many things available, but obviously the best pricing is for the bulk items.  Also, it is recommended to place an order of $50 or more, but it is okay if your order is smaller.  If it is smaller, there is a small-order fee, which I do not know the amount for.  My order was originally over $50, so I did not get charged for a smaller order due to them not sending my canning jars.  I do not know what happened to the jars and I guess this is one of those things I will learn more about as I go.

I guess something else you might want to know is that the orders are placed about every 4-5 weeks.  There is a pre-designated schedule, so you are not winging it month-by-month.  There is a cut-off for orders and then the orders will come a few days later.  A big semi delivers to a drop point and unloads everything.  Being the "cooperative" type, everyone pretty much makes sure that everyone else gets their boxes.  Pretty cool!

Feel free to add comments and let me know what other questions you may have and I'll answer them the best I can.  Or just sign up online and learn as you go, right along with me. :0)

Thursday, October 28, 2010

Exciting Find!

Okay, so most people would not get that excited about this, but I'm not most people.  I have had a Silpat mat on my Amazon wishlist for awhile now, but hadn't brought myself to chalk up the money to buy one.  Yesterday, I was browsing Costco's kitchen gadget section and stumbled across these:


MIU nonstick silicone baking liners

I was SO excited because #1)there were three of them in the box, #2)the price was only $19.99!, and #3)I had a Costco gift card begging to be used!  I snatched them up without any hesitation and promptly made a bee-line to the register. 

The box includes: 2-half-sheet pan liners (perfect size for cookie sheets) and 1-toaster oven sheet liner.

What great deals have you been excited to find lately?

Pumpkin puree

My husband has always told me how difficult it is to make pumpkin puree.  Based on his (not-so-great) experience, I had since avoided trying it.  However, my love for pumpkin finally inspired me to overcome my trepidation.  Lo and behold, this is a very simple thing to do!!  Here's is what I did.

Cut one pie pumpkin (3-4 lbs) in half horizontally.
Using a sturdy metal spoon, scoop out all of the seeds and strings.
Place the pumpkin in a deep pan, such as a roast pan or broiler pan.
Add about 1/2 inch of water to pan.
Bake at 325 degrees for about an hour, or until super soft.
Remove from oven and cool for several minutes.
Peel skin away from flesh.
Place flesh in food processor and puree until smooth.

I am completely addicted to this!  I can eat this as readily as my DD10 eats applesauce.  So far I've pureed two pumpkins and have found this: a 3-lb. pumpkin yields about 3 cups and a 4-lb. pumpkin yields about 4 cups.  That's easy to remember!  I would venture to guess that approximately 2 cups of fresh pureed pumpkin would be equivalent to a can of pumpkin.  So far I've only made my favorite healthy whole-wheat pumpkin pie pancakes, but I have great plans for muffins and soups and more.